 |
|
|
|
|
 |
|
|
|
|
|
|
|
|
|
|
|
|
|
|
|
|
|
|
PAINT PROBLEMS AND
SOLUTIONS
By: Klaus Raddatz
Paint application seems to be one of those more difficult areas of modeling to master. It's not an exact science, and the number of variables involved and how they affect one another along with finish quality, can befuddle even an experienced painter. And while a lot of great tips, advice, and techniques show up almost everywhere, troubleshooting paint problems sight unseen, is still pretty tough.
So, to add to the troubleshooting information arsenal, I shoveled the dust off of my old reference books and put together a list of paint problems and their causes. Notice I didn't say a complete list. This list is by no means complete, as plenty of other problems exist, but I tried to pare it down to those that are more likely to be encountered in the little booth.
It's all in alphabetical order and broken down into four areas: Condition, Cause, Prevention, and Remedy. The numbered items in Cause and Prevention are relative to one another, for example, Cause number 1 for a given problem can be avoided by Prevention number 1 for that same problem.
I hope you find it useful.
Klaus
BLEEDING
Condition:
A change in color of the paint that results from the pigment, or other colored material in the surface beneath the coating, moving upward into the applied film and becoming visible.Cause:
1. Contamination, in the form of soluble dyes or pigments (especially red), on the older finish before it was repainted.2. Wrong thinner or reducer - too slow.
Prevention:
1. Thoroughly clean the areas to be painted before and after sanding, especially when applying lighter colors over darker colors. Avoid using lighter colors over older shades of red without applying a sealer first.2. Select the thinner or reducer most suitable for existing shop conditions.
Remedy:
Apply a sealer before reapplying the color coat.BLISTERING
Condition:
Bubbles or pimples that appear in the topcoat film, sometimes months after application.Cause:
1. Improper surface cleaning or preparation. Dirt left on the surface can act as a sponge and hold moisture. When temperature or atmospheric pressure increases, the moisture expands and builds up pressure, resulting in blisters.2. Wrong thinner or reducer. Use of a fast-dry thinner or reducer, especially when the material is sprayed too dry or at an excessive pressure, can result in air or moisture being trapped in the film.
3. Excessive film thickness. Insufficient drying time between coats or too heavy an application of the undercoats can trap solvents that later escape and blister the color coat.
4. Contamination of compressed air lines with oil, water or dirt.
Prevention:
1. Thoroughly clean the areas to be painted before and after sanding. Ensure all surfaces are dry before applying coatings. Avoid touching the cleaned area with your bare hands to prevent skin oil from contaminating the surface.2. Select the thinner or reducer most suitable for existing shop conditions.
3. Allow proper drying time for undercoats and topcoats. Be sure to let each coat flash before applying the next coat.
4. Drain and clean air pressure regulator and drain air compressor tank daily.
Remedy:
In mild cases, the blisters can be sanded out, and refinished. If damage is severe, the paint must be removed down to the undercoat or substrate, depending on the depth of the blisters, and then refinished.BLUSHING
Condition:
A milky white haze that appears on the paint film.Cause:
1. In hot humid weather, moisture droplets become trapped in the wet paint film. Air currents from the spray gun, spray booth ventilation, and evaporation of the thinner tend to make the surface being sprayed lower in temperature than the surrounding atmosphere. This causes moisture in the air to condense on the wet paint film.2. Excessive air pressure.
3. Wrong thinner - too fast.
4. Low temperatures of the part, paint, and spray booth air, increase the chance of dropping below the dew point.
Prevention:
1. In hot humid weather try to schedule painting when temperature and humidity conditions are more suitable (70 deg. F, 45%-55% RH).2. Use proper gun adjustments and techniques.
3. Select a thinner that is suitable for existing shop conditions.
4. Allow parts, and paints to reach normal temperature. See also #1.
Remedy:
Add a retarder to the thinned color and apply additional coats.CHALKING
Condition:
A formation on the finish of pigment powder that is no longer held by the binder, producing a dull lookCause:
1. Wrong thinner or reducer affecting topcoat durability.2. Poorly mixed materials.
3. Paint film too thin.
4. Excessive mist coats when finishing or refinishing metallic color applications.
Prevention:
1. Select the thinner or reducer that is best suited for existing shop conditions.2. Stir all pigmented undercoats and topcoats thoroughly.
3. Meet or slightly exceed minimum film thickness specification.
4. Apply metallic color as evenly as possible so that misting is not required. When mist coats are necessary to even out the flake, avoid using straight reducer.
Remedy:
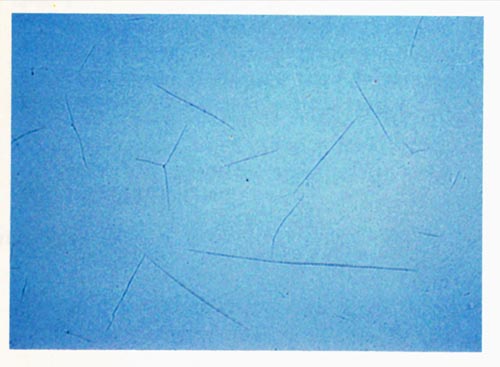
Remove surface in affected area by sanding, clean and refinish.CHECKING (LINE CHECKING)
Condition:
Similar to cracking, except that the lines or cracks are more parallel and range from very short up to about 18 inches.Cause:
1. Excessive film thickness.2. Improper surface preparation.
Prevention:
1. Avoid piling on topcoats. Allow sufficient flash and dry time. Do not dry by gun fanning.2. Thoroughly clean the areas to be painted before and after sanding. Ensure the surface is completely dry before applying undercoats and topcoats.
Remedy:
Remove topcoat down to the primer and apply new topcoat.CHECKING (MICRO-CHECKING)
Condition:
Appears as severe dulling of the film, but when examined with a magnifying glass, it contains many small cracks that do not touch. Micro-checking is an indication that cracking or crazing may develop.Remedy:
Remove the topcoat down to primer and apply new topcoatCRACKING
Condition:
A series of deep cracks resembling cracks in a dry pond, often going all the way through the topcoat and undercoatCause:
1. Excessive film thickness that magnifies normal stresses and strains in the paint film2. Poorly mixed materials.
3. Insufficient flash time.
4. Incorrect use of additive.
Prevention:
1. Allow sufficient flash and dry time between coats. Do not dry the coatings by gun fanning.2. Thoroughly mix all materials. Add fish eye eliminator as a preventative measure.
3. Same as 1.
4. Use only additives designed for the final paint film.
Remedy:
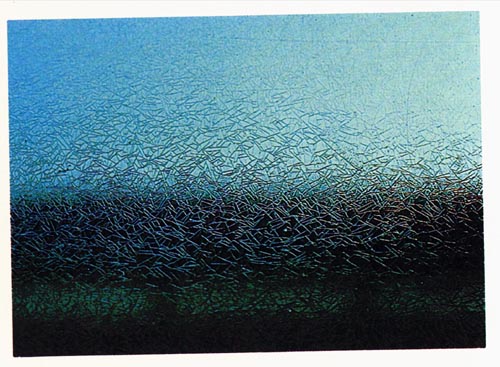
Sand the affected areas to a depth below the damage, and refinish.CRAZING
Condition:
Fine splits, small cracks, or crowsfeet, that completely checker an area in an irregular manner.Cause:
1. Shop too cold, literally causing the original material to shatter under the softening action of the solvents being applied.Prevention:
1. Select the correct thinner or reducer for existing shop conditions. Schedule painting to avoid temperature and humidity extremes in the shop; bring the part to room temperature before painting.Remedy:
1. Apply wet coats of the topcoat with the wettest thinner shop conditions will allow, to melt the crazing and flow the pattern together.2. Apply a fast-flashing topcoat to bridge over the cracks in the crazing area.
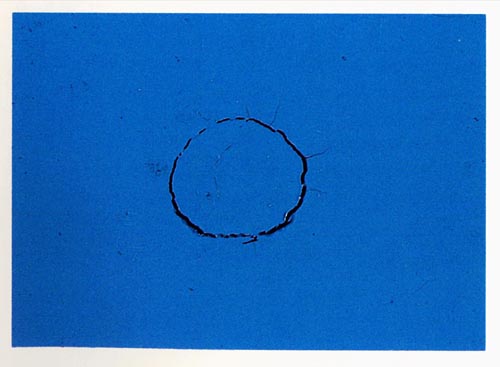
FEATHEREDGE SPLITTING
Condition:
Appears as stretch marks or cracking along the edge of a refinished area (featheredge); occurs during or shortly after a new topcoat applicationCause:
1. Piling on the undercoat causes solvent to become trapped in undercoat layers that have not had time to set-up.2. Poor mixing of materials, causes the paint to act like a sponge. As the solvent flashes the finish shrinks and pulls away from the refinished area.
3. Wrong thinner.
4. Improper surface cleaning or preparation. When not properly cleaned, primer-surfacer coats draw away from the edge because of poor adhesion.
5. Improper drying. Fanning with a spray gun after the primer-surfacer is applied results in drying the surface before solvent or air from the lower layers is released.
6. Excessive use and buildup of putty during the refinishing process.
Prevention:
1. Apply primer-surfacer in thin to medium coats with enough time between coats to allow solvents and air to escape.2. Mix all materials thoroughly.
3. Select only thinners that are suitable for existing shop conditions.
4. Thoroughly clean areas to be painted before and after sanding.
5. Same as #1.
6. Lacquer putty should be used in minimum amounts, applied in thin layers. Putty applied too heavily will eventually shrink and cause featheredge splitting.
Remedy:
Remove finish from the affected areas and refinish.FISH EYES
Condition:
Small crater-like openings in the finishCauses:
1. Improper surface cleaning or preparation, usually involving deposits of silicone or wax on the surface of the old topcoat.2. Effects of an old finish with embedded silicone that is not removable by solvent wiping.
3. Oil contamination of air lines.
Prevention:
1. Remove all traces of silicone or wax by thoroughly cleaning with a product designed for this purpose.2. Add fish eye eliminator to the topcoat.
3. Drain and clean the air pressure regulator daily.
Remedy:
After the affected coat has set up, apply a double coat of color containing the recommended amount of fish eye eliminator. In severe cases, the affected area should be sanded down and refinished.LIFTING
Condition:
Distortion or shriveling of the surface while the topcoat is being applied or drying.Cause:
1. Incompatible materials. Solvents in the new topcoat attack the old surface, e.g., lacquer over enamel.2. Insufficient flash time or drying between coats.
3. Improper surface cleaning or preparation.
4. Wrong thinner or reducer.
Prevention:
1. Use only materials that are compatible with the old surface, and designed for use with one another.2. Don't pile on topcoats. Allow sufficient flash and drying time. Topcoats should be applied when the previous coat is still soluble or after it has completely dried and is impervious to the topcoat solvents.
3. Thoroughly clean the areas to be painted before and after sanding. Ensure the surface is completely dry before applying undercoats and topcoats.
4. Use a thinner or reducer that is recommended for the topcoat being applied and is suitable for existing shop conditions.
Remedy:
Remove the finish from the affected area and refinish.MOTTLING
Condition:
A stripped or spotty appearance in metallic paints caused by the flakes floating together in the paint filmCauses:
1. Wrong thinner or reducer.2. Poor mixing of materials.
3. Spraying too wet.
4. Spraying too close to the part.
5. Uneven spray pattern.
6. Low shop temperature.
Prevention:
1. Select the thinner or reducer that is suitable for existing shop conditions, e.g., faster solvent in cold, damp weather; slower solvent in warm, dry weather. Mix all materials properly.2. Mix all materials, especially metallics, thoroughly.
3. Use proper gun adjustments, techniques, and air pressure.
4. Same as #3.
5. Keep your spray gun clean, and in good working order.
6. Same as #1.
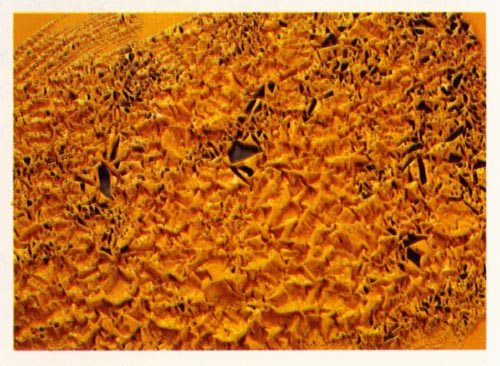
ORANGE PEEL
Condition:
Dimpled surface, like the skin of an orange, resulting from paint droplets drying too much to level out and flow smoothly together (poor coalescence)Cause:
1. Improper gun adjustment and techniques.2. Extreme shop temperature causing the droplets to lose more solvent and dry out before they can flow and level properly.
3. Improper drying by gun fanning causing the paint droplets to dry out before they have a chance to flow together.
4. Improper flash or drying time causing subsequent coats to lose solvents to the dry coat.
5. Wrong thinner or reducer, or too little thinner or reducer.
6. Poor mixing of materials.
Prevention:
1. Use proper gun adjustments, techniques, and air pressure.2. Schedule painting to avoid temperature and humidity extremes. Select thinner or reducer that is suitable for existing conditions. Use a slower evaporating thinner or reducer to overcome this.
3. Allow sufficient flash time. Do not dry by fanning.
4. Allow proper dry time for undercoats and topcoats.
5. Use the correct thinner and reducer in correct amounts for existing shop conditions.
6. Mix all pigmented coatings thoroughly.
Remedy:
In mild cases, a mild polishing compound for enamel or rubbing compound for lacquer may help. In severe cases, sand and refinish with a slower evaporating thinner or reducer at the correct air pressure.PEELING
Condition:
Loss of adhesion between the paint and substrateCause:
1. Improper cleaning or preparation. Dust or other surface contaminants preventing the paint film from coming into proper contact with the substrate.2. Poor mixing of materials.
3. Use of incorrect primer/sealer, or no primer/sealer.
Prevention:
1. Thoroughly clean areas to be painted.2. Mix all pigmented coatings thoroughly.
3. Primer/sealers are generally recommended to improve adhesion of topcoats.
Remedy:
Remove finish from an area slightly larger than the affected area and refinish.PINHOLING
Condition:
Tiny holes in the finish, putty or body filler, usually the result of trapped solvents, air or moistureCause:
1. Improper surface cleaning or preparation.2. Moisture or oil contamination of air lines.
3. Wrong gun adjustment or technique; paint application is too wet.
4. Wrong thinner or reducer; solvent is trapped by subsequent topcoats.
5. Improper dry. Fanning a wet finish can drive air into the surface or cause a skin-dry that results in pinholing when air or solvents come to the surface.
Prevention:
1. Thoroughly clean all areas to be painted. Ensure all surfaces are dry before applying coatings.2. Drain and clean air pressure regulator and drain air compressor tank daily.
3. Use proper gun adjustments, techniques, and air pressure.
4. Select the thinner or reducer that is suitable for existing shop conditions.
5. Allow sufficient flash and dry time. Do not dry by fanning.
Remedy:
Sand the affected area down to a smooth finish and refinish.RUNS or SAGS
Condition:
Heavy application of sprayed material that fails to adhere uniformly to the surface.Cause:
1. Too much thinner or reducer, or wrong thinner or reducer.2. Excessive film thickness or insufficient dry time between coats.
3. Low atomizing air pressure, gun too close to the part, or spraying speed too slow.
4. Shop, materials, or surface too cold.
Prevention:
1. Use the correct thinner or reducer in adequate amounts for existing shop conditions.2. Avoid piling on finishes. Allow sufficient flash and dry times between coats.
3. Use proper gun adjustments, techniques, and air pressure.
4. Allow part to warm up to room temperature before painting. Try to maintain appropriate shop temperature for painting (70 deg. F, 45%-55% RH).
Remedy:
Solvent wash the affected area, let dry and sand smooth before refinishing.SANDSCRATCH SWELLING
Enlarged sandscratches caused by swelling action of topcoat solvents.
Cause:
1. Improper surface preparation.2. Improper thinner or reducer causing undercoat to bridge scratches.
3. Sealer not used allowing topcoat solvents to penetrate and swell substrate.
Prevention:
1. Use appropriate grits of sanding materials for the topcoats you are using.2. Use the correct thinner or reducer in adequate mounts for existing shop conditions.
3. Use proper sealer to prevent solvent penetration into substrate.
Remedy:
Sand affected area down to smooth surface and apply appropriate surfacer before refinishing.SOLVENT POPPING
Condition:
Small holes in the paint film caused by rapid evaporation of trapped solvents or airCause:
1. Wrong thinner or reducer - too fast.2. Waterborne paints applied in high humidity.
3. Excessive film thickness, trapping solvents in the undercoats
Prevention:
1. Select the thinner or reducer that is suitable for existing shop conditions.2. Apply waterborne paint during low humidity or dehumidify the paint area.
3. Avoid piling on undercoats or topcoats. Allow sufficient flash and dry time. Do not dry by fanning.
Remedy:
In mild cases, the damage can be sanded out, and refinished. If damage is severe, the paint must be removed down to the undercoat or substrate, depending on the depth of the holes, and then refinished.WET SPOTS
Condition:
Spots of various sizes that are discolored, slow drying, or both.Cause:
1. Improper cleaning and preparation.2. Improper drying or excessive undercoat film build.
3. Wet sanding with contaminated solvent.
Prevention:
1. Thoroughly clean all areas to be painted.2. Allow sufficient flash and dry times for undercoats.
3. Use water when wet sanding.
Remedy:
Solvent wash or sand affected areas thoroughly and refinish.WRINKLING
Condition:
Surface distortions or shriveling that occurs while the enamel topcoat is being applied or drying.Causes:
1. Improper drying. Force drying the topcoat too soon causing the undercoats to soften.2. Piling on heavy or wet coats, which don't allow the lower wet coats to release their solvents and set-up at the same rate as the topcoat.
3. Improper reducer or incompatible materials, e.g., using a fast dry reducer, or lacquer thinner in enamel.
4. Improper shop temperature or drafts cause enamel surfaces to set-up unevenly.
Prevention:
1. Allow proper drying time for undercoats and topcoats.2. Don't pile on topcoats. Allow sufficient flash and drying times.
3. Select proper reducer and avoid using incompatible materials such as such as a reducer with lacquer products, or thinner with enamel products.
4. Schedule painting to avoid temperature extremes or rapid changes.
Remedy:
Remove wrinkled enamel and refinish.