 |
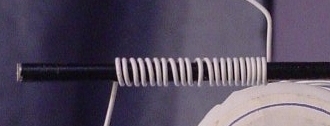
Obtain some styrene covered wire from the hobby shop, in
a diameter that closely approximates the diameter of the shocks you want
to make. I didn't measure what I used, but it's about 1/16" diameter. Use
a section of the wire as a form for the spring. For coilovers I prefer 24
guage bead wire, I'm sure other materials would work to, and the silver
wire can be polished or left a natural metal color. Wind the bead wire
tightly and close together onto the form. |
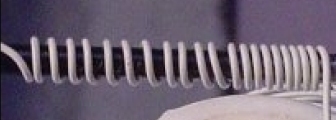
| Once you have a fair length wound (you might make some
extra to save this step later), you'll need to seperate the coils. I do
this with my thumbnail, putting my thumbnail into the groove between
windings, and just turn the form. It's sort of like a screw, your nail
will follow the wire, and spread the windings out a bit. This can also be
done with a piece of sheet plastic the thickness you want the spaces to
be. Just slide it in between the windings, press down, and turn. Slide it
carefully off of the form when you are done. |

 |
 |
Next, cut a section of the styrene covered wire the
length you need for your shock, use a kit piece for a reference (assuming
one is available). A little over halway down the length of the rod, you
want to cut off the styrene covering. Mark the line and carefully cut
through the styrene with a hobby knife. Just press into the plastic and
turn the rod, the plastic will cut easily - the wire core will
not. |
| Now gently slide the styrene covering from the wire. Be
careful not to ruin the piece you slide off, it will come in handy
later. |
 |
 |
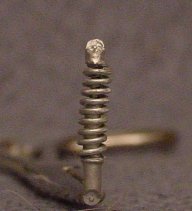
Once the covering is removed, you can see there is a
"shock body" with a "piston rod" protruding from it. At this point the
shock body (the fat part) can be painted the color of your
choice. |
 |
The trickiest part of this technique is making the
"spring retainers". These are simply plastic (or metal) discs that keep
the springs from sliding off of the shock body and rod. These can be made
with a punch set - punch them out of sheet plastic - or thin slices of
metal tubing (plastic tubing is too thick to look right). For the tubing
method, find a piece of tubing that slides tightly over your coated wire
and cut thin slices from it. The next smaller size tubing should also be
at hand because the fit on the rod will be very loose.A smaller size
tubing is handy here to fill the gap, though there are probably other ways
around that problem. |
| The covering that was removed to expose the wire is shown
here, cut into short lengths to act as shock eyes - you'll need one for
each end. The "spring retainer" disc has been slid over the shock body, as
well as the "spring" being slid over the body and rod and cut to length.
Paint the shock "eye" and "retainer" disc to match the shock
body. |
 |
 |
Add the disc and eye to the other end, and your shock is
finished, except for final painting. |