 |
|
|
|
 |
|
|
|
|
|
|
|
|
|
|
|
|
|
There has not been much of a selection in 1/24 - 1/25 scale motorcycles. Revell did some Parts-Pack motorcycles in the '60s (a BSA, a Honda, a Triumph and a Harley), but they're reissue was cancelled due to a lack of pre-orders. Hasegawa has some "multimedia" race bike kits, diecast metal with a plastic frame, wheels and other parts and photoetched details. Those run about $15. Revell recently introduced a Harley Dyna-Glide in a set with a Ford pickup (apparently discontinued already). Also, there are a number of "collectible" diecasts, such as Onyx's Ducatis, available - but they tend to be rather expensive.
There is another choice, although they seem to be hard to find in the U.S.
(mine came from Canada). Motor Max makes a series of "diecast" toy bikes that
are fairly well detailed and cost about $2 each (or less). Well, fairly well
detailed to an extent. Some of the bikes in the series are just awful, others
are just awesome.
NEWS FLASH: MotorMax motorcycles are
now available from Hobby
Heaven!!!
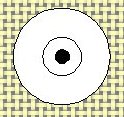
The "chopper" and one of the "Police Bikes" are terrible. The Kawasaki Police 1000 is one of, if not the, best in the series. The Kawasaki Ninjas, Honda Interceptor and Yamaha Virago are pretty nice, although the Ninja has a mold line right down the center of the windscreen (I'm going to have to repaint mine due to removing the seam). I haven't had a chance to scale the one dirt bike I have, a Kawasaki KLR 650, but it looks nice.
The bikes really do look better than these pictures suggest. I just got a new digital camera, and I'm working on finding out what it "likes" to take good pics - lighting, distance, etc.
 |
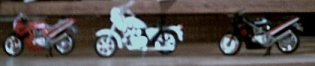 |
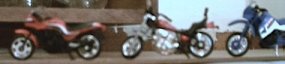
| Left to right: Kawasaki GPz, Yamaha Virago and the front of a Kawasaki KLR650. | Left to right: Red Kawasaki Ninja, Kawasaki Police 1000, Black Kawasaki Ninja. |
The black Ninja and the GPz in the above pics have front brake rotors added. The GPz has some detail painting done on the frame. The Police 1000 has HO scale generic "Highway Patrol" markings added to the tank, and is missing it's saddlebags. Unfortunately, none of this really shows in these pics. I'll take better ones soon - skills permitting, of course.
A bit of detail painting helps a lot. Flow a bit of a dark colored metallizer
between the cylinder fins, pick out the chassis details in silver, flat black
and Dark Anodonic Gray to start with. The Ninjas have a radiator/oil cooler
molded in gray plastic. Paint the finned areas flat black and the tanks and
center support rod (a diagonal slash) gloss black. The radiator/ oil cooler
hooks onto 2 small locators cast into the header, it pops off easily and without
damage. Paint the locators flat black to help hide them.
This is my Yamaha Virago, after a bit of
detail painting. It's also wearing the rims and tires from a Revell
Harley.
1 Wheels & tires:
The first thing that jumps out about the Motor Max bikes would have to be the puny tires. One of my Ninjas currently wears the wheels and tires from a Hasegawa race bike. They look really good, but they're a bit large in diameter as well as being a bit wide (but being wide is okay, especially for the rear tire ;o)). That's a rather expensive option.
A slightly more unusual choice, but still racing slicks, is present on my Honda Interceptor. I modified the wheels to accept an O-ring of appropriate diameter and width. There is a lip present in the middle of the wheel that must be removed. Looks acceptable to me. The O-rings are very glossy when new, make sure to knock the gloss down.
The racing slicks are not appropriate for a police bike, however. For my Kawasaki Police 1000, I found a set of Revell (I think) funny car front tires that look good. These too require modification. The inside of the tire needs to be trimmed smooth, there is a lip present to help locate the funny car wheels. The wheels need to be modified in the same way as for the O-rings. They represent a ribbed type tire that looks at home on the police bike.
2 Forks
|
This is a general statement, but the street bikes are made pretty similar (except the Virago). The wheel mounting area of the front forks are a bit too heavy. There is a large disc shaped area in the vicinity of the wheel mounting rivet, something like the drawing to the right. |
 |
 |
The solution is simply to trim down that area, close to - but not into - the existing rivet hole. It might be more appropriate to fill in the rivet hole and drill a new one, but I haven't done that. |
This simple modification helps to greatly improve the look of the bike's
front end.
Here's a shot of the
Kawasaki Police 1000....missing the front wheel.
3 Rivets
The heads of the rivets are too large and detract from the realism of the bikes. What I've done is cut a piece of aluminum rod to the length needed for the axle and filed the ends flat. Making the axle ends flush with the fork makes it look less toylike.
At the very least, paint the ends of the rivets to match the forks.....possibly with a small silver dot to represent the axle.
4 Brakes
Some of the bikes, such as the KLR 650, have front brake detail molded onto the forks. This may look okay with a bit of detail painting. The street bikes, however, have nothing for the front brakes. I haven't done the calipers yet, but I will get dimensions for them once I do. The rotors can be made very simply. I used a drafting divider (a compass might work too) to scribe circles onto a sheet of plastic. I made the front rotors 10mm in diameter, the rears about 7mm. Simply scribing the circles onto the sheet, and continuing through, makes it easy to create circular pieces of plastic. It takes a bit of practice to keep the divider on the same path, but the results are nice.
Painting the rotors silver (Testors Metallizers work very nicely too) makes them look metallic. They aren't very detailed (compared to the Hasegawa photoetched pieces on my Ninja), but they add a lot to the bike - much better than nothing. I have heard that Gunze Sangyo makes a metallizer that is just incredible for detailing brake rotor, shiny from dead-on - darker at an angle, but I haven't found a source for it yet yet.
I haven't checked all of the bikes, but the Ninjas (red and black) have the rear calipers molded to the swingarm. No calipers are present on the front, something I plan to rectify soon on my bikes.
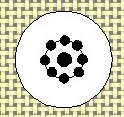
How to make the brake rotors:
You will need: sheet plastic ("For Sale" signs work nicely), a set of small drafting dividers (or a compass and a scribing tool that fits it), a metric ruler or caliper, a 1.5mm drill bit and a 1mm drill bit.A bit of research will be handy here as some of the motorcycles represented in this line have 2 rotors on the front, others have only one.
 |
 |
 |
 |
 |
| Scribe a circle of the appropriate diameter (10-12mm for front rotors) into sheet plastic, keep scribing until it is free from the sheet. | Scribe a smaller circle into the "rotor" (5-6mm in diameter or larger, depending what you want) just deep enough to leave a demarcation line. | Drill the center hole, pivot point for the dividers, to 1.5mm. | Drill 1mm holes evenly spaced in a circular pattern around the "demarcation line" you scribed earlier. | Paint the rotors your choice of silver paint. Paint the centers, up to the "demarcation line", in a different shade of silver or gold. Painting the centers a different color enhances the realism and adds visual interest to this area. |
 |  |  |
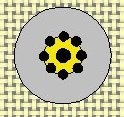
| Red Kawasaki Ninja, out of the box stock | Black Kawasaki Ninja with unpainted plastic discs added | Kawasaki GPz with painted discs with drilled holes for "carrier" |
The rear rotors should be 7-8mm in diameter, the "demarcation line" is optional as is painting the centers a different color.
Some bikes have a smaller amount of material on the outer edges of the rotors, hence larger centers (a.k.a. carriers). This technique, and the measurements, can be adjusted to duplicate the look you want.
The rear rotors from a 1:18 Maisto diecast motorcycle can also be used as fronts on the Motor Max bikes, but it seems silly to spend $1.97 each for rotors to put on a Motor Max bike.
5 Exhaust
The exhaust systems look okay, although they are incomplete from underneath. The Drag Bike has probably the neatest looking header, but it's engine is way undersized - more like a parallel twin than a 4-cylinder. Drilling out the ends of the pipes helps a lot, there are no openings for the exit! The Kawasaki Police 1000 and the GPz1100 have the exhaust mounted to the rivet which holds the rear wheel in place. I have not yet investigated how to visually improve this, although I suspect that painting the "bracket" to the rivet flat black would help. This bracket is the same color as the exhaust pipes on the GPz, and it does not look as obvious as on the Police 1000. A bit of filing to reduce the size of the bracket may help too.
6 Other touches.
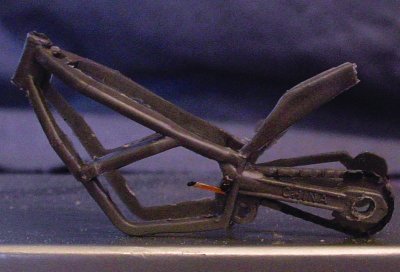
Pegs and shifter/brake levers may help a bit too. This is just a teaser for
now showing my shift lever and pegs on a Ninja frame. I may tell more later
;o)