 |
|
|
|
 |
|
|
|
|
|
|
|
|
|
|
|
|
|
Making Dome Lights
By: Christopher Roldan
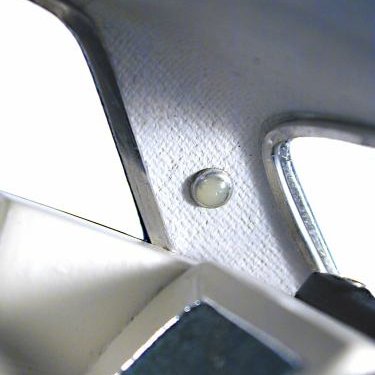
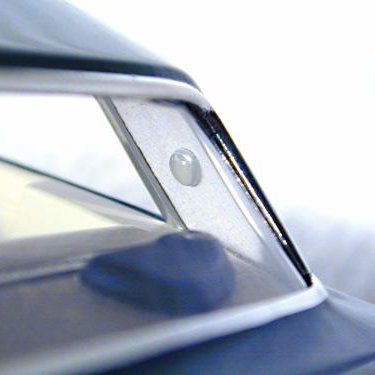
This is one of my favorite overlooked Interior details on a model and yet it is so easy to achieve such a nice job on this little number that even a beginner can't go wrong!
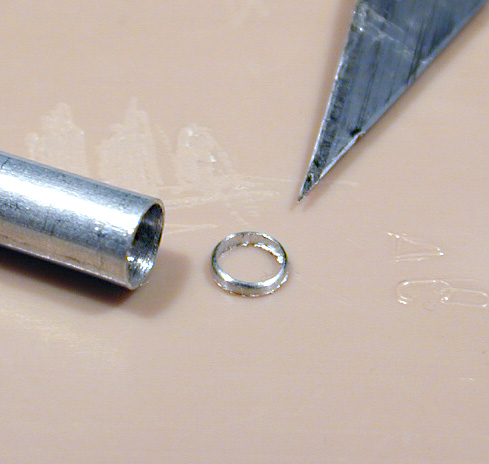
First start by cutting a thin "ring" off some 1/8" or 5/32" aluminum tube (This could also be done with brass or styrene tube, but the aluminum doesn't require painting - just a bit of polishing if you want it shiny). This is done by placing the tube on a cutting mat then laying the sharp edge of a #11 Xacto blade on the tube and rolling the tube back and forth, with the blade applying light pressure until the ring is cut off. When you're done cutting the ring, it shouldn't be any thicker than about 1/32". If you try to cut it any thinner the piece of tubing will just collapse as you cut.
Once your ring is cut and ready, go ahead and glue it in any place you desire! Then mix a small amount of 5 minute epoxy and add a tiny, and I do mean tiny!.....a tiny dab of white paint to your mixing stick to mix in with the epoxy. DO NOT stir it fast!! Stir it SLOWLY before the setting time to avoid bubbles getting trapped in the mixture. Your mixture should look "milky clear".
Place a drop of the epoxy mixture inside the ring, you'll want a "bubble effect", but you don't want it run down the sides of the ring either. Then, just set it all aside while the epoxy sets.
For my '63 Grand Sport Impala I placed them on the rear pillar for a stock look. If you're doing a custom you can place these on a door, below the dash, how about in a trunk? While you're at it, why not under the hood? Hey, how about between your eyeballs?
By substituting red paint for the white, you can also use this technique to make custom taillights!
Hope this helps!