 |
|
|
|
 |
|
|
|
|
|
|
|
|
|
|
|
|
|
By: Bill Geary & Tim Doty
This article is a bit different from the others presented on the Model Car Tech site. It was written to illustrate the techniques of a master modeler, and, then, put into practice by me. Bill Geary explains the technique he uses for making working door latches. From this explanation, I used the technique, the first time i've attempted something of this nature. In case you have not heard of Bill Geary, he is a consistent show winner on the East Coast. Hailing from Pennsylvania, Bill has won "Best in Show" at the NNL East and the annual Toledo NNL. His 1958 Chevrolet convertible, 1969 Dodge Daytona and 1957 Corvette have been shown in Scale Auto Magazine and Model Cars Magazine. Bill's models feature an amazing number of working features - and amazing workmanship! His current project, a 1964 Pontiac GTO convertible, features a working convertible top!!! Now that I have "properly" introduced Mr. Geary, on to the how-to!! Please excuse my poor attempt at creating an illustration for this technique, I am by no means an artist. Bill will take it from here...........
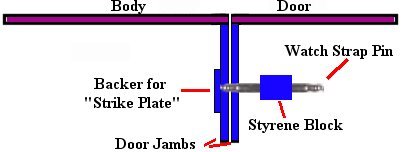
Drawing by Tim Doty
First, when you build the door jamb on the body, and on the door itself, you need to make sure the "latch" lines up properly. Drill a hole straight through both door jambs, body and door. I like to use 1:1 reference photos of approximately where the striker latch is on the car. The drill bit size will depend on what size watch pin you are using. You want a size big enough for the end of the pin to go into. Although I made mine large enough for the whole pin (just the part that slides) to fit in the hole.
Next on the door, position the watch pin in relation to the hole you just drilled in the door jamb. You may have to use some block plastic to make the watch pin even with the hole.....you don't want the pin at an angle in the door, otherwise the pin will not latch properly. To make the pins fit through the "blocks" a round file will be necessary to make a hole big enough for the pins to slide through.
By the way.....DO USE liquid cement to glue the alignment blocks inside the door.
Next after you've established where the pin will be, you now want to put a piece of plastic behind the hole that you drilled in the body door jamb......in other words you are making a little "step" in the door jamb on the body.
This is where REAL patience comes in! Now that you have every thing lined up, position the watch pin in the door and try to close the door so that it "clicks' in the "step" on the body door jamb. If you find that the door closes, but it doesn't want to open back up, move the watch pin back just a teeny tiny bit, until you get the door to open and close freely. To hear the little "click" I put just a tiny drop of super glue inside the "step". This will also keep the latch from wearing out over time.
Once you have the doors the way you want them epoxy the pins into the "blocks" that they will slide into which are glued into the inside of the door.
This I will admit takes a lot of trial and error! I would do all of the latching of the doors BEFORE you do any painting, and before you do any interior work.
After every thing is all painted and polished, you might want to make simulated strikers surrounding the "step" in the body door jamb. On my '69 Daytona, I made these out of cat food can aluminum! I just shaped them so that they went around the "step" and epoxyied them in, adding 2 HO brass bolts each after they were drilled with a #75 drill bit.
One more thing, I would put some super glue around the perimeter of the styrene sheet that you put behind the hole. This will ensure that the pin doesn't push the plastic out in time. I don't know how much tension your watch spring has, but some of them are pretty strong!
Bill Geary